# 这里有一份react的基础进阶
这段时间一直在复习react,也学到了很多不一样的东西,下面总结一下
# JSX
- JSX 是一种JS和HTML的混合语法,将组件的结构、数据甚至样式都聚合在一起定义组件
- JSX 其实是一种语法糖,最终会通过babel(babel-loader @babel/core @babel/preset-react)转译成
createElement语法 - 其中
@babel/preset-react会负责把HTML标签转成JS代码,如
let element = (
    <div id="container" className="container">
        hello
        <span className="world">
            world
        </span>
    </div>
)

// 会被转化成 =>

var element = React.createElement("div", {
  id: "container",
  className: "container"
}, "hello", React.createElement("span", {
  className: "world"
}, "world"));
TIP
为什么代码中一定要引入React?
这个问题就很好解答了,通过babel转义最后全部JSX代码都会转成React.createElement的形式,这也是为什么我们一定要引入React的原因.
# 实现 VitrualDom
# 实现 createElement
我们知道 JSX语法会转义成 React.createElement 语法,那么我们试着实现一下这个React.createElement方法
首先我们先看下 React.createElement方法 返回了什么
import React from 'react'
import ReactDOM from 'react-dom'
let element = (
    <div id="container" className="container">
        hello
        <span className="world">
            world
        </span>
    </div>
)
console.log(element)
ReactDOM.render(element, window.root)
我们看下打印的结果
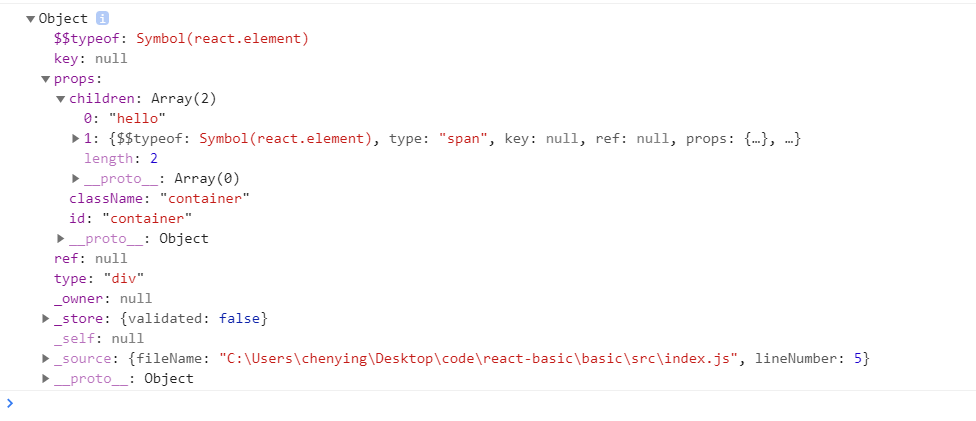
我们可以简单理一下返回的react元素结构
$$typeof :$$typeof是一个 Symbol类型的变量,它被赋值为
REACT_ELEMENT_TYPE,这个变量可以防止 XSSprops:当前元素的属性,包含
children、className、id等type:当前元素的标签类型
...
我们这里主要实现最重要的 props 和 type
// react/index.tsx
interface ReactElement {
    type: any,
    props: any,
}

function createElement(type: string, config: Record<string, any>, ...children: Array<any>): ReactElement {
    let propName: string;
    const props: Record<string, any> = {};
    for (propName in config) {
        props[propName] = config[propName]
    }
    props.children = children
    const element: ReactElement = { type, props }
    return element
}

export default createElement
这是参考源码实现的一款简易版的createElement, 但是ts水平有限,这里实现不了源码中对children的处理,源码中如果没有children 则返回 undefined, 如果儿子的数量是1,则返回一个对象,如果儿子的数量 > 1 ,则返回一个数组,知道这个特性可以让我们在开发映射子组件的时候避免很多bug。
# 实现 render
- 支持渲染普通dom
// react-dom/index.tsx
interface ReactElement {
    type: any,
    props: any,
}

function render(element: ReactElement, container: HTMLElement): any {
    if (typeof element === 'string' || typeof element === 'number') {
        // 如果是文本的话 直接追加到 container 中
        return container.appendChild(document.createTextNode(element))
    }
    let type: string = element.type // 拿到元素的类型 如 div
    let props: Record<string, any> = element.props // 拿到元素全部的属性 className Style children ...
    const domElement: HTMLElement = document.createElement(type) // 创建真实dom
    let propsName: string
    for (propsName in props) {
        if (propsName === 'className') { // 如果是 class 直接挂载到真实dom
            domElement.className = props[propsName]
        } else if (propsName === 'style') { // 如果是style 遍历挂载
            const styleObj: CSSStyleDeclaration = props[propsName]
            for (let attr in styleObj) {
                domElement.style[attr] = styleObj[attr]
            }
        } else if (propsName === 'children') { // 如果是子元素,循环遍历挂载
            props[propsName].forEach((child: ReactElement) => {
                render(child, domElement)
            });
        }
    }
    container.appendChild(domElement) // 挂载到容器上
}

export default {
    render
}
- 支持渲染函数组件
我们知道函数组件返回的是一个react元素 这样的话就好办了
function render(element: ReactElement, container: HTMLElement): any {
    if (typeof element === 'string' || typeof element === 'number') {
        // 如果是文本的话 直接追加到 container 中
        return container.appendChild(document.createTextNode(element))
    }
    let type: any = element.type // 拿到元素的类型 如 div
    let props: Record<string, any> = element.props // 拿到元素全部的属性 className Style children ...
    /*
        新增支持函数组件
    */
    if (typeof type === 'function') { // 如果是函数组件
        let renderElement = type(props)
        type = renderElement.type
        props = renderElement.props
    }
    /*
        新增支持函数组件
    */
    const domElement: HTMLElement = document.createElement(type) // 创建真实dom
    let propsName: string
    for (propsName in props) {
        if (propsName === 'className') { // 如果是 class 直接挂载到真实dom
            domElement.className = props[propsName]
        } else if (propsName === 'style') { // 如果是style 遍历挂载
            const styleObj: CSSStyleDeclaration = props[propsName]
            for (let attr in styleObj) {
                domElement.style[attr] = styleObj[attr]
            }
        } else if (propsName === 'children') { // 如果是子元素,循环遍历挂载
            props[propsName].forEach((child: ReactElement) => {
                render(child, domElement)
            });
        }
    }
    container.appendChild(domElement) // 挂载到容器上
}

export default {
    render
}
- 支持渲染类组件
支持类组件的话我们这里模仿不了,因为我们知道类组件是继承react.component的,里面有他对应判断是不是类组件的标识,我们只需要知道如果是类组件的话,处理方式是new一下然后执行组件的render方法就可以得到react元素了。
# 实现 context
- 在react中
context的用法很多,不单单是解决了单一数据流导致嵌套组件很难获取到数据的情况,在redux、react-router中的应用也非常的广泛,这里就不写他的基本用法了,我们直接来模拟实现一下
function createContext<T>(defalutValue: T) {
    interface ProvideProps<T> {
        value: T
    }
    interface ProvideState {
        value: T
    }
    interface ConsumerPorps {
        children: (vaule: T) => React.ReactNode
    }
    class Provider extends React.Component<ProvideProps<T>> {
        static value: T = defalutValue // 定义静态属性,其实Provider 组件能实现共享的原因是子组件拿到的就是这个静态属性
        constructor(props: ProvideProps<T>) {
            super(props)
            Provider.value = props.value // 将Provider组件传进来的共享数据的值赋值给静态属性
        }
        static getDerivedStateFromProps(nextProps: ProvideProps<T>, prevState: ProvideState) {
            Provider.value = nextProps.value // 保证下一次的值是最新的
        }
        render() {
            return (
                this.props.children // 直接渲染子元素就好了
            )
        }
    }
    class Consumer extends React.Component<ConsumerPorps> {
        render() {
            return (
                this.props.children(Provider.value) // 实际上拿到的还是Provider.value
            )
        }
    }
    return {
        Provider,
        Consumer,
    }
}
这里需要注意一些,类组件的话获取上下文是通过
static contextType = Context
来获取的,我们这里模仿不了这种情况,比较麻烦,我们只需要知道上述代码中 Context的值就是我们Provider.value的值就好了
# setState是同步的还是异步的?
在 React的生命周期和合成事件中, React仍然处于他的更新机制中,这时无论调用多少次
setState,都会不会立即执行更新,而是将要更新的·存入_pendingStateQueue,将要更新的组件存入dirtyComponent。当上一次更新机制执行完毕,以生命周期为例,所有组件,即最顶层组件 didmount后会将批处理标志设置为 false。这时将取出
dirtyComponent中的组件以及_pendingStateQueue中的 state进行更新。这样就可以确保组件不会被重新渲染多次。所以,当我们在执行
setState后立即去获取state,这时是获取不到更新后的state的,因为处于 React的批处理机制中,state被暂存起来,待批处理机制完成之后,统一进行更新。结论:
setState本身并不是异步的,而是 React的批处理机制给人一种异步的假象。
# React和原生事件的执行顺序是什么?可以混用吗?
React的所有事件都通过 document进行统一分发。当真实 Dom触发事件后冒泡到 document后才会对 React事件进行处理。
所以原生的事件会先执行,然后执行 React合成事件,最后执行真正在 document上挂载的事件
React事件和原生事件最好不要混用。原生事件中如果执行了
stopPropagation方法,则会导致其他 React事件失效。因为所有元素的事件将无法冒泡到 document上,导致所有的 React事件都将无法被触发。
# React组件的渲染流程是什么?
使用
React.createElement或 JSX编写 React组件,实际上所有的 JSX代码最后都会转换成React.createElement(...), Babel帮助我们完成了这个转换的过程。createElement函数对 key和 ref等特殊的 props进行处理,并获取 defaultProps对默认 props进行赋值,并且对传入的孩子节点进行处理,最终构造成一个 ReactElement对象(所谓的虚拟 DOM)。ReactDOM.render将生成好的虚拟 DOM渲染到指定容器上,其中采用了批处理、事务等机制并且对特定浏览器进行了性能优化,最终转换为真实 DOM。