# 手摸手实现react-router
# 前端路由初认识
- 我们知道,前端路由分为两种:
hash,history, 其中我们最熟悉的是hash模式了,hash模式在切换路由的时候页面不刷新,但是对应的内容可以改变, 最好的一点是他的兼容性很好,可以兼容到ie6等,但是他也有一个缺点就是不美观,总是带一个#号 - 和
hash模式对应的是history模式了,这里就不主要描述history模式了,但是可以稍微理解一下他的不好的地方:默认我们的h5 history api 他不支持强制刷新, 服务器上不存在这个路径就是报找不到
# hash 模式初体验
我们先通过一个简单的例子来了解hash模式
<!DOCTYPE html>
<html lang="en">
<head>
    <meta charset="UTF-8">
    <meta name="viewport" content="width=device-width, initial-scale=1.0">
    <meta http-equiv="X-UA-Compatible" content="ie=edge">
    <title>Document</title>
</head>
<body>
    <a href="#/home">首页</a>
    <a href="#/about">关于</a>
    <div id="container"></div>
    <script>
        //我们可以通过下面的方法监控hash的变化
        window.addEventListener('hashchange',() => { //但是这个方法只能监听hash变化的时候 不能初始化
            container.innerHTML = window.location.hash
        })
        window.location.hash = window.location.hash.slice(1) || '/' // 所以需要页面初始化
        container.innerHTML = window.location.hash
    </script>
</body>
</html>
我们先来看下效果图吧
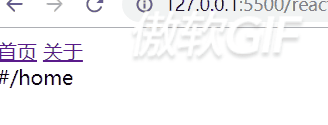
通过上面这个例子我们可以发现,其实hash模式下最核心的就是通过 hashchange来监听hash值的变化,来进行对应的逻辑的操作
# history 模式初体验
在体验 history之前,我们先来看下一个重要的属性 window.history
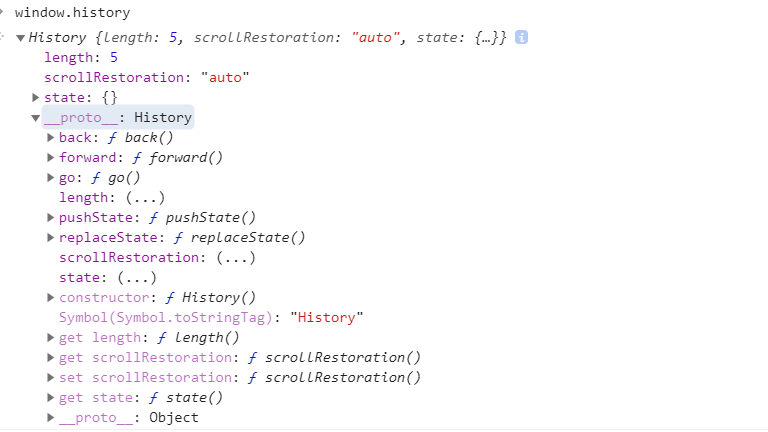
对我们来说最主要的就是pushState方法了,他可以控制路由进栈出栈,来实现路由跳转的效果
我们先通过一个简单的例子来了解history模式
<!DOCTYPE html>
<html lang="en">
<head>
    <meta charset="UTF-8">
    <meta name="viewport" content="width=device-width, initial-scale=1.0">
    <meta http-equiv="X-UA-Compatible" content="ie=edge">
    <title>Document</title>
</head>
<body>
    <a onclick="push('/')">首页</a>
    <a onclick="push('/about')">关于</a>
    <div id="container"></div>
    <script>
        // 默认我们的h5 history api 他不支持强制刷新 服务器上不存在这个路劲
        // 解决方法 如果页面上不存在这个路径 就帮你重定向到首页 并且再让首页跳转到对应的路径
        function push(path) {
            history.pushState({}, null, path)
            container.innerHTML = path
        }
        // 默认前进后退是不会调用pushstate方法的 所以需要
        window.addEventListener('popstate', () => {
            container.innerHTML = window.location.pathname
        })
    </script>
</body>
</html>
我们看下效果图
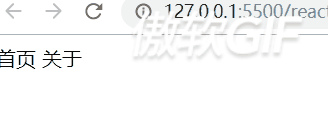
在代码中我们可以发现,我们通过history.pushState方法进行路由跳转,但是我们也知道history模式下的一个缺点就是如果路径不正确的话会报找不到的错误,这个后续有谈到怎么处理;我们还需要注意的一点是,浏览器的前进和后退是不会调用history.pushState方法的,所以我们需要通过监听popstate来判断浏览器是否前进后退,来实现我们自己的逻辑
# react-router 的基本用法
- react的路由有两种 HashRouter 和 BrwoseRouter 分别对应着前端的hash 和 history路由
这次我们用 react-router4 来完成下面的例子
TIP
react-router4 和 react-router3 的安装方式不一样,需要注意哦
import React from 'react';
import ReactDOM from 'react-dom';
import { HashRouter as Router, Route, Link } from 'react-router-dom'
import Home from './pages/Home'
import User from './pages/User'
import Profile from './pages/Profile'

ReactDOM.render(
<Router>
    <Route path="/" component={Home} />
    <Route path="/user" component={User} />
    <Route path="/profile" component={Profile} />
</Router>
, document.getElementById('root'));
上面这个是最简单的react-router用法了,我们先来了解一下细节
react路由需要引入,里面提供一些组件,和redux类似
react路由提供一个路由容器,容器里面放着一条一条路由
HashRouter提供了一个对象,对象里面包括history、location、match等属性, 然后传递给后代全部组件Route 路由的作用: 拿到父组件传递进来的路径, 判断和自己身上的路径是否相等, 如果相等就渲染自己的component
我们来看下实际的效果

但是我们可以发现一下小问题,就是匹配的路径并不准确,同时匹配并且渲染了/ 和 /user等,这就引入了exact的知识点
<Route exact={true} path="/" component={Home} />
这样就可以准确的匹配到对应的路径了
# 手写一个最简单的 react-router
TIP
上面我们已经大致了解了最简单的react-router的用法,现在我们来实现第一版的react-router
项目结构
── react-router-dom
   ├── HashRouter.js
   ├── context.js
   ├── index.js
   ├── Route.js
   └── Link.js
── index.js
// react-router-dom/index.js

import HashRouter from './HashRouter'
import Route from './Route'
import Link from './Link'
export {
    HashRouter,
    Route,
    Link,
}
这是我们react-router的汇总导出文件,很简单就不多做介绍了
// react-router-dom/context.js

import React from 'react'

export default React.createContext()
在之前的分析中我们知道, HashRouter组件提供了一个对象,对象里面包括 history、 location、 match等属性, 然后传递给后代全部组件,那么实现这个传递给全部后台组件的通信方式在react中非context莫属了
TIP
HashRouter
import React from 'react'
import Context from './context' // 引入上下文

export default class HashRouter extends React.Component{
    state = {
        location: {
            pathname: window.location.hash.slice(1) || '/', // 获取hash值和边界值处理
            state: null,
        }
    }
    componentDidMount() {
        // 组件加载完毕 默认跳转到首页 如果有就采用默认的
        window.location.hash = window.location.hash.slice(1) || '/'

        // 监听hash的变化
        window.addEventListener('hashchange', () => {
            this.setState({
                location: { // 这样解构可以很好的在原有的基础上添加 pathname 而不会影响到默认的属性
                    ...this.state.location,
                    pathname: window.location.hash.slice(1)
                }
            })
        })
    }
    render(){
        let value= { // 传递给子组件的值 包括 loction history match等
            location: this.state.location, // location 提供pathname 和 state
            history: { // history提供一些方法
                push: (to) => {
                    if (typeof to === 'object') {
                        let { pathname, state } = to
                        window.location.hash = pathname
                    } else {
                        window.location.hash = to // 因为在componentDidMount的时候已经进行了hash的监听 这里会触发setstate
                    }
                }
            },
        }
        return (
            <Context.Provider value={value}>
                {this.props.children}
            </Context.Provider>
        )
    }
}
其实理解了基本用法之后看上述的代码很简单,HashRouter其实就是一个容器组件,他的作用是往子组件传递一些属性和方法,如当前的hash路径(location.pathname), 页面跳转的方法(history.push), 然后进行一些渲染的边界值处理,最后无条件的渲染this.props.children
TIP
Route
import React from 'react'
import context from './context'

export default class Route extends React.Component{
    static contextType = context
    render(){
        let pathname = this.context.location.pathname
        let { path, component:Component, exact=false } = this.props
        let props = {
            ...this.context
        }
        // 如果路劲匹配 就渲染对应的组件 但是这样渲染的话 匹配不准确 而且我们还有一个exact属性
        if (path === pathname) {
            return <Component {...props} /> // 透传给组件 不要丢失了数据哦
        }
        // 最终写法 含有excat的准确匹配
        return null
    }
}
Route的理解也很简单,在组件内部我们通过上下文context获取到父组件传递下来的pathname,然后通过props获取到传递的 path 和 component等,通过判断pathname 和 path 的值,如果相等就渲染对应的组件就好了
到这里为止,我们就实现了一个最简单的react-router了哦,其实核心就在于获取到当前的hash的值,然后通过上下文实现数据共享

# 手写 Link 组件
实现了最简单的效果之后啊,我们试下把代码升级下, 引入Link组件
ReactDOM.render(
<Router>
    <>
        <nav>
            <Link to={{pathname: '/', state:{title: 'cy'}}}>首页</Link>
            <Link to="/user">用户</Link>
            <Link to="/profile">个人</Link>
        </nav>
        <Route exact={true} path="/" component={Home} />
        <Route path="/user" component={User} />
        <Route path="/profile" component={Profile} />
    </>
</Router>
, document.getElementById('root'));
效果如下
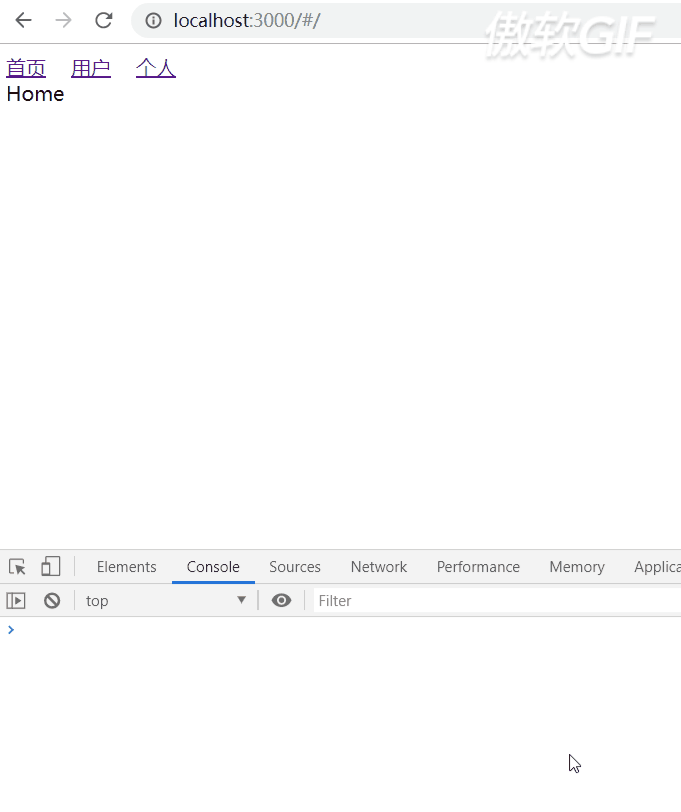
我们可以发现,通过点击Link组件,我们可以自动的跳转到Link组件上传递的路径,以及拿到传递下去的值, 根据这个思路我们试下来实现Link组件
TIP
Link组件
import React from 'react'
import context from './context'

export default class Link extends React.Component{
    static contextType = context
    render(){
        let { to } = this.props

        return <a onClick={() => {
            this.context.history.push(to) //实际上link标签的跳转是通过history的push方法
        }}>{this.props.children}</a>
    }
}

// link标签实际上就是一个a标签  因为react路由模式有hash和history 所以这里就不用href的方法了 统一通过点击的方法
在代码中我们可以发现, Link组件实际上是一个a标签,并且通过绑定点击事件调用上下文中的history.push方法进行的页面跳转,那么我们吧重心放在history.push方法上面
// HashRouter.js
    componentDidMount() {
        window.location.hash = window.location.hash.slice(1) || '/'
        window.addEventListener('hashchange', () => {
            this.setState({
                location: {
                    ...this.state.location,
                    state: this.state.locationState, // 新 路径刷新的时候把state附带上去
                    pathname: window.location.hash.slice(1)
                }
            })
        })
    }
    locationState = null // 新 实际上相当于 this.locationState = null
    render(){
        let value= {
            location: this.state.location,
            history: {
                push: (to) => {
                    if (typeof to === 'object') {
                        let { pathname, state } = to
                        this.locationState = state // 新
                        window.location.hash = pathname
                    } else {
                        window.location.hash = to
                    }
                }
            },
        }
看了上述新增的代码,是不是所有谜团都解开了,Link组件的跳转,首先需要判断Link组件中传递的是对象还是字符串,然后走对应的逻辑,而点击Link组件跳转实际上就是通过window.location.hash = xxx进行的跳转,并且通过上下文来传递state的值
# 实现 exact
在实现exact之前,我们先了解一个第三方正则工具的用法 - path-to-regexp,这个库广泛用于很多框架的路由匹配,如koa、express等
const pathToRegexp = require('path-to-regexp')

let url = '/user'

let requestUrl = '/user/1/2'

let reg = pathToRegexp(url, [], {end: false})
console.log(reg) // /^\/user\/?(?=\/|$)/i
console.log(reg.test(requestUrl)) // true
我们来大致看一下产出的正则/^\/user\/?(?=\/|$)/i 他的意思是如果/user后面带/+其他东西的是可以匹配上的,也就是我们说的非严格模式
const pathToRegexp = require('path-to-regexp')

let url = '/user'

let requestUrl = '/user/1/2'

let reg = pathToRegexp(url, [], {end: true})
console.log(reg) ///^\/user\/?$/i
console.log(reg.test(requestUrl)) // false
我们来大致看一下产出的正则/^\/user\/?$/i 他的意思是只有/user是可以匹配上的,也就是我们说的严格模式
看了上面2种基本用法,那我们就可以来实现一下这个exact了
// Route.js
import React from 'react'
import context from './context'
import pathToRegExp from 'path-to-regexp'

export default class Route extends React.Component{
    static contextType = context
    render(){
        let pathname = this.context.location.pathname
        let { path, component:Component, exact=false } = this.props

        let reg = pathToRegExp(path, [], {end: exact}) // 新
        let props = {
            ...this.context
        }
        if (reg.test(pathname)) { //新
            return <Component {...props} />
        }
        return null
    }
}
# 实现Switch组件和Redirect组件
老规矩我们先来看下基本的用法
    <Switch>
        <Route exact={true} path="/" component={Home} />
        <Route exact={false} path="/user" component={User} />
        <Route path="/profile" component={Profile} />
        <Redirect to="/"></Redirect>
    </Switch>
先说一下switch组件的用途,我们知道匹配路径的时候是循环匹配的,如果我们有重复的路径是不是会渲染多个组件,switch组件就是用来处理这个问题的,而Redirect组件顾名思义就是用来重定向的,当全部路径都没有匹配到的时候,跳转到某一个路径,用途知道了,我们实现实现他们
// Redirect.js
import React from 'react'
import context from './context'
export default class Redirect extends React.Component{
    static contextType = context
    render() {
        this.context.history.push(this.props.to)
        return null
    }
}
// Redirect的作用是 如果渲染这个路由 就跳转到对应的页面
其实Redirect组件就是调用history.push方法进行跳转
switch组件比较复杂,我们实现来实现以下
import React from 'react'
import context from './context'
import pathToRegExp from 'path-to-regexp'

export default class Switch extends React.Component{
    static contextType = context
    render() {
        // 兼容单个Route存在的情况
        let children = Array.isArray(this.props.children) ? this.props.children : [this.props.children]
        for(let i = 0; i< children.length; i++) {
            let child = children[i] // 需要注意这里拿到的是虚拟dom
            let { path='/', exact=false } = child.props // path就是用户配置的路径
            let { pathname } = this.context.location
            let reg = pathToRegExp(path, [], {end: exact})
            if (reg.test(pathname)) {
                return child // 如果匹配到就直接返回 不渲染下面的组件
            }
        }
        return null
    }
}
// Switch的作用是 循环所有子孩子 如果一个路径匹配就停止循环
# 总结
还有一些知识点,如如何携带参数这些就不写了,大致了解一下React-router的思路就好了