# 【源码】Computed 源码解析
# 前言
今天我们就不从基础用法开始讲了, 直接上源码, 通过这篇文章我们可以知道
computed是如何进行初始化的computed是怎么进行计算的computed是如何实现缓存的computed内部是如何触发更新的
....
# 初始化
我们来看下源码的初始化
function Vue(){
    ...
    initState(this)
    ...
}

// vue/src/core/instance/state.js

export function initState (vm: Component) {
  vm._watchers = []
  const opts = vm.$options
  if (opts.props) initProps(vm, opts.props)
  if (opts.methods) initMethods(vm, opts.methods)
  if (opts.data) {
    initData(vm)
  } else {
    observe(vm._data = {}, true /* asRootData */)
  }
  if (opts.computed) initComputed(vm, opts.computed)
  if (opts.watch && opts.watch !== nativeWatch) {
    initWatch(vm, opts.watch)
  }
}
从上述代码我们可以发现, 当我们new Vue() 的时候会调用initState()处理Vue的各种钩子, 其中对computed的处理在props、methods、data之后
而处理computed的方法是initComputed(), 我们接下来看下这个方法
# initComputed
// vue/src/core/instance/state.js
// 以下代码有为了方便阅读, 省略了一些不必要的判断逻辑代码
const computedWatcherOptions = { lazy: true }

function initComputed (vm: Component, computed: Object) {
  const watchers = vm._computedWatchers = Object.create(null) // 创建一个watchers对象,并挂载到vm._computedWatchers

  const isSSR = isServerRendering() // 判断当前环境是不是SSR渲染

  for (const key in computed) { // 循环获取到每个computed钩子上的函数或对象
    const userDef = computed[key] // 每个computed钩子上的函数或对象
    const getter = typeof userDef === 'function' ? userDef : userDef.get // 如果是对象则取get, 获取回调函数

    if (!isSSR) { // 如果不是SSR, 为每个 computed 配发 watcher
      watchers[key] = new Watcher(
        vm,
        getter || noop,
        noop,
        computedWatcherOptions
      )
    }

    if (!(key in vm)) { // 如果实例上没有同名, 则调用defineComputed
      defineComputed(vm, key, userDef)
    }
  }
}
其实initComputed主要做了几件事:
为每个
computed派发watcher对每个
computed做defineComputed处理收集所有
computed的watcher
我们接下来一一解释一下这几件事情
# 为每个 computed 派发 watcher
我们先来看下Watch到底是什么
// vue/src/core/observer/watcher.js
// 以下代码进行了省略
class Watcher {
  vm: Component;
  lazy: boolean;
  dirty: boolean;
  getter: Function;
  value: any;

  constructor (
    vm: Component,
    expOrFn: string | Function,
    options?: ?Object,
  ) {
    if (options) {
      this.lazy = !!options.lazy
    }
    this.dirty = this.lazy
    if (typeof expOrFn === 'function') {
      this.getter = expOrFn
    } else {
      this.getter = parsePath(expOrFn)
    }

    this.value = this.lazy
      ? undefined
      : this.get()
  }
我们理一下上述代码做了啥
# 缓存getter
把用户设置的 computed-getter函数保存到 watcher.getter
# 缓存getter的计算结果
watcher.value 用于存放computed-getter运行的结果, 但是这里需要注意的是因为 lazy 的原因,不会新建实例并马上读取值
# 初始化 dirty 的值
在代码中我们可以发现this.dirty = this.lazy, 我们后序会讲到dirty是整个计算属性缓存的关键, 如果dirty为true,
表示所依赖的数据变化了, 不能使用缓存。而这一步赋值的意义在于,给dirty一个初始值,表示开始了缓存任务.
我们大致可以看到 computed 和 watcher 有什么关系了
至于如何通过dirty实现缓存,我们接下来说
# 对每个 computed 做defineComputed处理
我们来看下defineComputed的源码
// vue/src/core/instance/state.js
// 源码有省略
export function defineComputed (
  target: any,
  key: string,
  userDef: Object | Function
) {
  if (typeof userDef === 'function') { // 如果是函数
    sharedPropertyDefinition.get = shouldCache
      ? createComputedGetter(key) // 调用createComputedGetter对getter进行包装
      : createGetterInvoker(userDef)
    sharedPropertyDefinition.set = noop
  } else { // 如果是对象
    sharedPropertyDefinition.get = userDef.get
      ? shouldCache && userDef.cache !== false
        ? createComputedGetter(key) // 调用createComputedGetter对getter进行包装
        : createGetterInvoker(userDef.get)
      : noop
    sharedPropertyDefinition.set = userDef.set || noop
  }

  Object.defineProperty(target, key, sharedPropertyDefinition) // target === vm
}
在上诉代码中我们可以了解到
通过
Object.defineProperty(vm, getter, cb)的方式让我们在实例上可以拿到getterset 函数默认是空函数,如果用户设置,则使用用户设置
通过
createComputedGetter包装getter
其实最重要的就是第三点了, 因为第三点实现了我们computed的核心逻辑, 即data发生改变引起computed发生改变, 最后刷新视图,我们来看下createComputedGetter的源码
// vue/src/core/instance/state.js
function createComputedGetter (key) {
  return function computedGetter () {
    const watcher = this._computedWatchers && this._computedWatchers[key] // 拿到当前的watch
    if (watcher) {
      if (watcher.dirty) { // 第一次获取computed的时候 dirty为true 执行watcher.evaluate()
        watcher.evaluate()
      }
      if (Dep.target) {
        watcher.depend()
      }
      return watcher.value
    }
  }
}
我们了解一下createComputedGetter()主要处理了什么
# 控制缓存
通过代码控制缓存
if (watcher.dirty) {
    watcher.evaluate()
}

// vue/src/core/observer/watcher.js
evaluate () {
    this.value = this.get()
    this.dirty = false
}
watcher.evaluate()的作用是计算出新的值,更新缓存的值, 然后设置dirty的值为false,表示缓存已经更新了
# 缓存的实现
目前我们知道dirty是控制缓存的关键,那么dirty是如何控制计算属性的缓存的么?
假设我们有一个计算属性A依赖于data中的B, 也就是B收集了A的watch,那么当B发生改变的时候会通知A进行更新,也就是调用了A的watch的update方法
// vue/src/core/observer/watcher.js
  update () {
    if (this.lazy) {
      this.dirty = true
    }
    ....
  }
通过update方法将dirty设置为true, 就会调用watcher.evaluate()方法获取到最新的数据了
# 和data、视图建立联系
我们知道, 当computed所依赖的数据data发生改变的时候, 会触发computed的改变, 最后触发视图更新,那么这条链路是如何实现的呢?
关键在于下面的代码
if (watcher.dirty) { // 第一次获取computed的时候 dirty为true 执行watcher.evaluate()
    watcher.evaluate()
}
if (Dep.target) {
    watcher.depend()
}

evaluate () {
    this.value = this.get()
    this.dirty = false
}
当我们第一次获取computed的时候, 会调用Watch.get(), 我们来看下
get () {
    pushTarget(this)
    let value
    ...
    const vm = this.vm
    value = this.getter.call(vm, vm)
    popTarget()
    ...
    return value
}
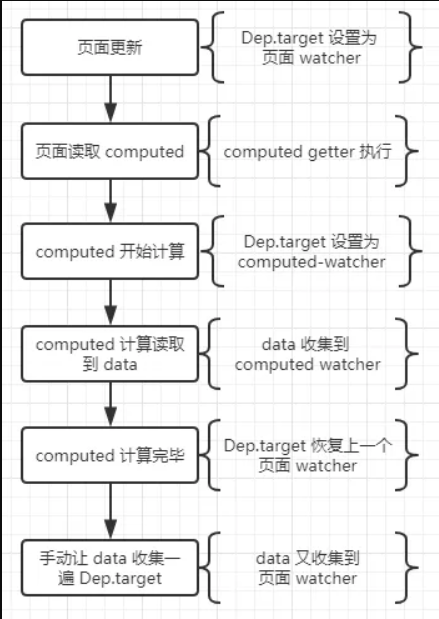
连接的详情流程为:
在页面更新读取
computed的时候,Dep.target会设置为 页面watcher在我们读取
computed,调用get()方法获取值的时候,先通过pushTarget(this)将当前的Dep.target被设置为computed-watcher然后
this.getter.call(vm, vm)执行, 在执行的时候回调中对data进行读取,所以computed-watcher也会保存到data的依赖收集器dep中再然后通过
popTarget()释放Dep.target, 此时Dep.target的值还原为页面watcher最后通过手动调用
watcher.depend(), 将此时的Dep.target的值保存到data的依赖收集器dep中此时 data 的依赖收集器 =【computed-watcher,页面watcher】
我们知道 data 发生改变的时候会正序遍历依赖收集器,所以就实现了data发生改变的时候, 会触发computed的改变, 最后触发视图更新,如下图
# 总结
通过对源码的阅读,我们知道计算属性的核心还是通过Object.defineProperty来实现的,它和method最本质的区别是它可以通过dirty实现缓存,另外计算属性更新的连接流程也是我们需要掌握的